
Wooden Pallet Wall Decor: Rustic DIY Ideas & Tips
Key Takeaways
- Wooden pallet wall decor adds rustic texture and personality to any room. Trending looks include gray wash, white wash, and blue winter-inspired palettes;
- Safe DIY starts with HT-stamped pallets, thorough prep, and a stud-secured install that protects your walls and ensures long-term results;
- For wall art without nails, Mixtiles photo tiles are lightweight and repositionable, so you can create gallery walls on painted surfaces with zero damage;
- Plan a balanced layout, estimate cost and time, and maintain your wood wall to keep its reclaimed character looking fresh for years.
Wooden pallet wall decor adds warmth, texture, and character to any room, from cozy farmhouse to clean modern. Whether you want a reclaimed wood accent wall or rustic pallet wall art, a clear plan makes everything easier. This guide covers trending wood looks, safe DIY steps, renter-friendly alternatives, and photo display ideas that protect your walls. You will also see how Mixtiles’ adhesive, repositionable photo tiles help you personalize your space in minutes, no tools needed.
Ready to add instant, wall-safe personality? Create your own photo tiles now, or explore our full collection of wall arts for more inspiration.
What is wooden pallet wall decor, and is it right for your space?
It is any wall decor that uses pallet wood or reclaimed wood planks to create texture: full accent walls, partial panels, or pallet decor boards used as art. If you love rustic wooden character and want more depth than paint, it is a great fit. Living rooms, bedrooms, entryways, and media walls benefit most because warm wood contrasts nicely with drywall, TV screens, and soft furnishings in various shades.
Think through light and color. A white wash or light gray wood wall brightens small rooms, while deeper barn wood and weathered wood tones feel cozy in larger spaces. Blue and coastal-inspired blends can lift a dim hallway. If your interior design leans modern, select tight seams and consistent tones for a clean wood look.
Which wooden pallet wall decor styles are trending right now?
The most popular looks balance rustic wood charm with a polished finish. Choose the palette that matches your home decor and the mood you want to create.
Rustic farmhouse blends

Mixed browns, reclaimed pallet tones, and subtle distressing create a classic rustic pallet vibe. Use different board widths for texture, or keep uniform planks for a calmer look in the living room.
Coastal and winter-inspired palettes

Light woods layered with white, blue, and tan echo beachy interiors. These palettes feel airy and work well with white sofas, pale rugs, and minimal wall panels.
Modern gray wash and silver tones

Gray-washed reclaimed wood planks bring a sleek, contemporary edge while keeping grain visible. Pair with matte black lighting and simple wall art for a refined result.
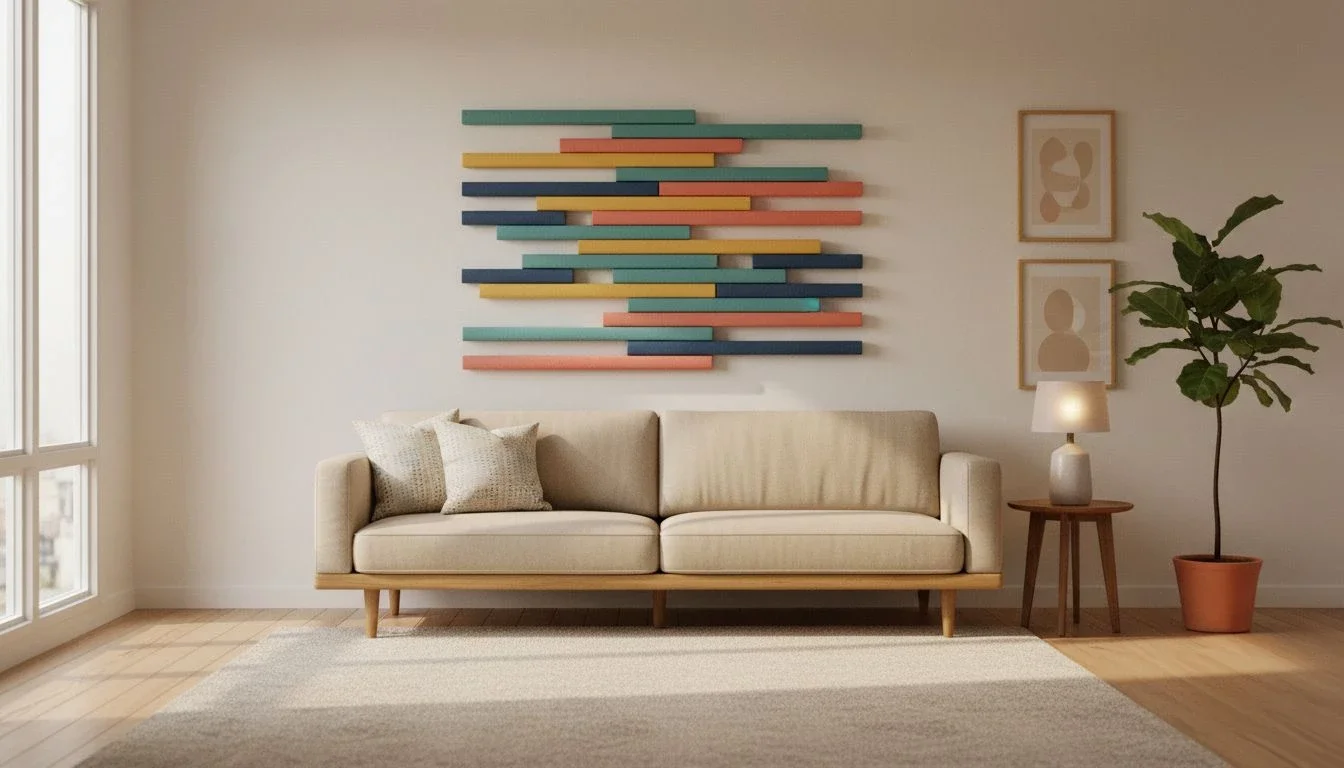
Statement pallet art and signs

Pallet wall art, typography boards, and silhouettes add personality without covering the whole wall. Try a reclaimed wood sign above a console or a gallery of small pallet decor pieces.
Seasonal pallet decor

Rotating pieces, like snowflake boards or rustic wooden pumpkins, offer easy refreshes. Keep a few small reclaimed wood panels on hand for quick holiday projects.
How do you build a safe, beautiful pallet accent wall?
Success starts with safe sourcing, careful prep, and a secure install. Choose heat-treated pallets, clean and sand thoroughly, plan your layout, and fasten into studs so the pallet wood wall stays solid over time.
Source your wood wisely
Choose HT-stamped wooden pallets. Avoid MB-treated wood. Inspect every board for pests, stains, or strong odors. Reclaimed wood is beautiful, but safety and cleanliness come first.
Tools and materials checklist
Gather these basics before starting your DIY pallet project so you work efficiently and safely:
- Pry bar or oscillating tool for disassembly;
- Hammer, pliers, and de-nailing tools;
- Orbital sander and medium-fine sandpaper;
- Stud finder, level, tape measure, and pencil;
- Brad nailer or finish nails, plus construction adhesive when appropriate;
- Outlet extenders, trim, and a fine-toothed saw;
- Wood sealant or clear matte topcoat;
- Gloves, mask, and eye protection.
Prep the boards
Remove nails, wash with mild soap, and let dry fully. Sand sharp edges and sort by color and length. Seal boards lightly to control dust and lock in the rustic wood character without making the surface shiny.
Plan your layout
Mark a level starter line. Stagger seams for strength and visual rhythm. Mix tones across the wall so reclaimed wood variations look intentional, not patchy. Decide on horizontal or vertical planks to suit ceiling height and the overall wall decor.
Install with confidence
Fasten into studs for long-term hold. Adhesive can supplement nails, but do not rely on glue alone on textured surfaces. Work row by row, check level often, and trim carefully around outlets and edges for a crisp finish.
Quick safety checklist
- Wear gloves, a dust mask, and eye protection;
- Ventilate your workspace;
- Secure ladders and support long boards;
- Test-fit around outlets before cutting;
- Clean up nails and splinters promptly.
How can you display photos on a pallet wall without damage?
Heavy frames can split thin boards or pull on adhesive. Choose light, wall-safe options and plan displays on painted areas near your pallet wood to keep both the photos and the wood pristine.
The challenge with heavy frames
Traditional frames need screws that may crack pallet panels. Weight can also stress adhesive-backed installs. Keep hardware minimal on reclaimed surfaces.
Lightweight, damage-free options
Mixtiles photo tiles use stick-and-restick technology on painted walls, so you can build a gallery next to or surrounding your wood pallet wall without holes. If you want photos directly over wood, mount a slim painted drywall strip or ledge first, then place Mixtiles on that smooth surface. For more ways to get a hole-free setup, see our guide on how to hang wall art without nails.
Why Mixtiles work so well
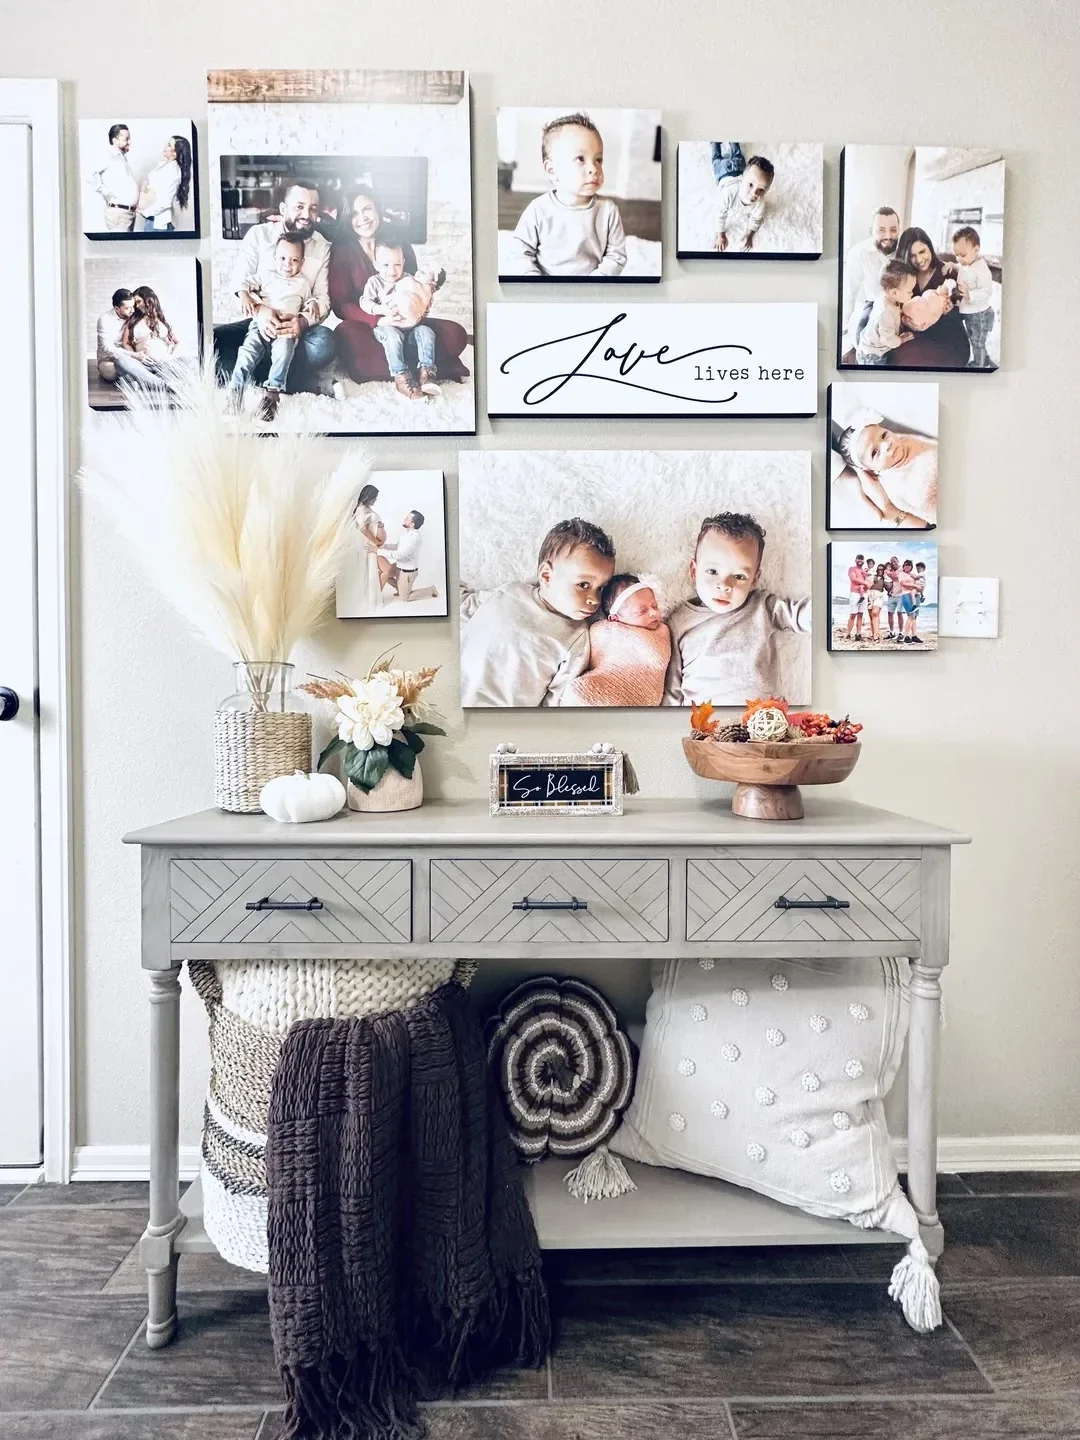
Mixtiles are slim and light, yet secure. You can choose framed or frameless styles, canvas photo prints, or Gallery Wall Kits. They arrive ready to stick, so your wall art layout is fast to create and easy to adjust.
Design a wall-safe photo gallery in minutes. Upload your favorite pictures to create a beautiful photo gallery wall or individual canvas prints, delivered right to your door.
Not ready to commit? What renter-friendly alternatives look like pallet walls?
If you rent, try temporary solutions that mimic reclaimed wood without permanent fasteners. These options deliver a similar wood look with easier removal.
Peel-and-stick wood planks
Real or engineered wood planks with adhesive backs install quickly on smooth walls. Choose white wash, gray, or warm rustic wood to match different styles.
Faux wood wall panels
Lightweight wall panels simulate weathered wood and barn wood textures. Cuts are simple and removal is less invasive than full nailed installs.
Fabric or wallpaper backdrops
Woodgrain prints create an instant reclaimed wood effect, perfect for photo shoots, events, or temporary interior design updates.
Photo-first approach with Mixtiles
A large Mixtiles grid in wood-toned frames brings warmth and depth, especially in a living room. Combine with one small board of pallet decor for authentic texture without committing to a full wood wall.
How much does a wooden pallet wall cost, and how long will it take?
Cost and timing vary by materials and scope. Free pallets reduce spend but increase prep time. Pre-finished boards or panels cost more but install faster. Use this snapshot to plan your project.
|
Option |
Approx cost per 50 sq ft |
DIY time |
Notes |
|---|---|---|---|
|
Reclaimed or free wood pallets |
$0 to $150 |
1 to 2 weekends |
More labor for disassembly and sanding; verify HT stamps. |
|
Purchased reclaimed wood planks |
$200 to $500 |
1 weekend |
Cleaner boards, faster install; consistent thickness. |
|
Peel-and-stick wood panels |
$300 to $600 |
1 day |
Quickest install on smooth, painted walls. |
|
Faux wood wall panels |
$250 to $550 |
1 day |
Lightweight, good for renters with minimal fasteners. |
|
Mixtiles gallery solution |
$80 to $300 |
Under 1 hour |
Damage-free wall art; ideal near or around pallet decor. |
What layout ideas make pallet walls and photo galleries feel polished?
Keep spacing consistent, center artwork to furniture, and coordinate tones. Align frames with board lines where possible so the composition looks intentional. For step-by-step planning, explore our tutorial on how to arrange art on a wall and our comprehensive wall art size guide.
Clean grids
A 3x3 or 4x4 grid of picture tiles above a sofa feels crisp against rustic wood panels. Leave 8 to 10 inches between the top of furniture and the bottom row.
Mixed gallery
Blend a small reclaimed pallet board sign with Mixtiles in various sizes. The soft frames balance the rough texture of wood pallets for a curated look.
Linear or triptych lines
Slim rows work well in hallways. Align the center line at eye level for easy viewing and a gallery feel.
Space-by-space placement
Over headboards, keep art 6 to 8 inches above pillows. In entryways, use narrow grids so traffic can flow without bumping frames. If you are unsure about exact mounting height, check our guide on how high to hang art on a wall.
How do you keep wooden pallet wall decor looking great over time?
Dust gently, control humidity, and check for movement as seasons change. A light protective finish helps preserve color while keeping the rustic wooden texture.
Maintenance and care
Use a soft brush on a vacuum or a dry cloth to remove dust. Avoid harsh cleaners that can strip patina. Re-secure any lifted boards and touch up edges as needed.
Sunlight and humidity
Direct sun can lighten tones, especially white wash and blue accents. Stable indoor humidity prevents gaps. A clear matte sealer can protect reclaimed wood without adding shine.
Wooden pallet wall decor brings timeless character to your home, whether you choose a full wood pallet wall or a few reclaimed pallet boards as wall art. With smart sourcing and careful DIY, you will get a beautiful, long-lasting result. For fast personalization without holes, build a gallery with Mixtiles. The adhesive frames stick, restick, and make your decor flexible as your style evolves.
Make your walls uniquely yours. Start building custom gallery walls or explore other ideas for your photo walls. Peel, stick, and restick for the perfect look with no nails required.
Frequently Asked Questions
How much does a pallet wood wall cost?
If you source free, heat-treated pallets, materials for 50 sq ft often total $0 to $150, covering fasteners, sanding, and sealant. Buying reclaimed planks runs $200 to $500. Peel-and-stick panels cost more, but save hours of prep and installation time.
What pallet wall designs are popular?
Options include horizontal or vertical planks, herringbone or chevron patterns, mixed widths, and partial accent panels. Finishes range from white wash and gray wash to coastal blues and natural barn wood. Keep seams tight for modern rooms, mix tones for rustic character.
Can I use pallet wood for interior walls?
Yes, choose HT-stamped pallets, avoid MB markings. Clean, dry, and de-nail boards, sand edges, then lightly seal to control dust. Fasten into studs, not just drywall, and plan for outlet extenders. Proper prep makes pallet walls safe and durable indoors.
Will pallet wood attract termites or pests?
Any wood can attract termites. Lower risk by using heat-treated pallets, keeping boards dry, and avoiding ground contact. Inspect for pests before use, consider a borate treatment or clear sealer, and maintain stable indoor humidity. Monitor periodically for frass or soft spots.
How can I hang photos on or near a pallet wall without damage?
Heavy frames can split thin boards. Use lightweight, wall-safe options on nearby painted surfaces. Mixtiles photo tiles stick and restick without holes, ideal around a pallet wall. If placing over wood, add a smooth painted strip or ledge first, then apply tiles.

Be the first to know — deals, news & decor ideas.
By clicking you agree to the Terms of Use & Privacy Policy